-
-
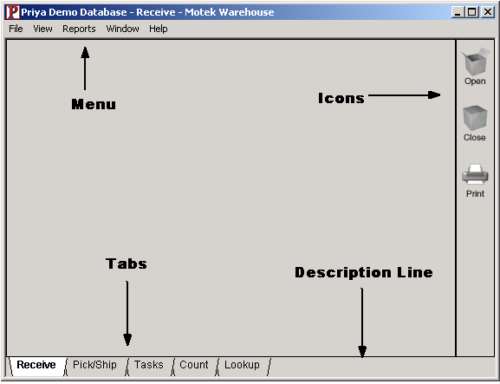
Main work area screen
-
-
-
-
Menu
The Menu bar is located at the top of the screen, the menu represents system operations that are grouped in commands. To select a menu operation, click on the menu choice, then click again on one of the options. If the option is grayed (dimmed) out, then the operation is not available (configured) in the current contents of the screen.FileSelect this operation to change the warehouse, change the Printer or Label setup, logout of the system or exit from the system completely.ViewSelect this operation to view the screens for the selected tab. See Overview Tab Bar for further details.ReportsSelect this operation to print reports for the selected tab. See Overview Viewing and Printing Reports for further details.WindowSelect this operation to split a window horizontally or vertically, to select tabs from the keyboard (“Move to Tab Window”), to hide the Icon Bar from the screen (uncheck Icon Window), or to close a window.HelpSelect this operation to view the version of the workstation, or to get the On-Line Help.
-
Icons
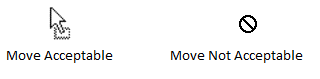
Icon bar is located on the right hand side of the screen, the icons represent system functions. When dragging and dropping an object to the icons, keep an eye on the bottom of the screen (next to the tab bar) for a description line explaining what it will do. Depending on the screen context, select the object by clicking on it, dragging it to the Icon Bar, and dropping it on the corresponding icon. For example, dragging an item to the Printer icon will print an Item Tag.If the icon drop is valid, the cursor will turn into a “Yes” symbol indicated by an arrow over a box. A message will also appear on the bottom of the screen. If the icon drop is invalid it will turn into a “No” symbol indicated by a circle with a line through it.
Note, to hide the Icon Bar, from the Main Menu select “Window” then “Icon Window.” To show the Icon Bar again, from the Main Menu select “Window” then “Icon Window.” Open
Open
Anytime an object can be dragged to an empty window for a “quick view” the object can also be dragged to the Open icon to save the step of creating an empty window first. (For example, to perform a quick view of a Product Lookup while viewing a location, select the product and drag it to the Open icon and a new window with the Product Lookup will be displayed.) Close
Close
Drag a window’s header to the Close icon to close the window. For example, dragging a “Location” window header to the Close icon will close the location window. Print
Print
To print a tag for an object, drag the object to the Printer icon (ex. highlight pallet number 000000123 and drag it over to the printer icon to print pallet tag 000000123). To pre-print tags, right-click on the Printer icon. See Overview Printing Labels for further details. View
View
The View icon is used to determine the field name for adding new columns to a screen. It is also used when certifying a new release to see additional information when an error occurs. In order to see the View icon you must belong to the Developer user group. To add a user to a user group see System Configurations Selecting Users for a User Group for further details. To add new columns to a screen, see Warehouse Configuration Adding Screen Columns for further details.
-
Description Line
Located at the bottom right hand side of the screen, the description line describes what a function will do. When dragging and dropping an object to the icons, keep an eye on the Description Line for an explanation of what it will do.
-
Tabs
Tab bar is located at the bottom of the screen, the tab bar represents Priya operations. The active tab is white with bold text, while the non-active tabs are gray (dimmed out). Another way to tell which operation is active is that the header at the top of the screen will indicate the current warehouse, along with the active operation. To change to a different operation, use the mouse to click on another tab.The tabs described below represent Priya’s default configuration. To customize the tabs, see System Configuration Configuration (Tabs, Views and Reports) for further details.ReceiveSelect this tab to view inbound screens and reports and to receive inventory into the warehouse.Pick/ShipSelect this tab to view outbound screens and reports and ship inventory out of the warehouse.TasksSelect this tab to view task screens and reports and to manage task assignments (ex. putaways, picking, replenishments, counting).CountSelect this tab to view count screens and reports and to manage count sessions.LookupSelect this tab to view informational screens and reports such as tracking warehouse movement, viewing currently logged in users and looking up a product and location.
-
-
Navigation
-
Keyboard Hotkeys
- Enter Key: Usually opens a new window for PO’s and orders.
- F5 Key: This will refresh the window in focus.
- F7 (Split window vertically)
- F8 (Split window horizontally)
- Enter Key: Usually opens a new window for PO’s and orders.
-
Mouse Hotkeys
- Right Click: Opens a menu screen
- Drag and Drop to Open icon
- Drag and Drop window to Close icon
- Drag and Drop to another screen
- Selecting range of items (Using the Shift key + Mouse)
- Use to move a Range of PO’s, Orders, Palletes, Inventory, etc. from one area to another.
- Use to move a Range of PO’s, Orders, Palletes, Inventory, etc. from one area to another.
- Selecting multiple items (Using the Control Key + Mouse)
- A more accurate selection of PO’s, Orders, Palletes, Inventory, etc. moving them from one area to another.
- A more accurate selection of PO’s, Orders, Palletes, Inventory, etc. moving them from one area to another.
- Right Click: Opens a menu screen
- Right Click Functionality
- Right click is used to bring up multiple Menu options
- Main menu options include:
- View
- Report
- Split Horizontally
- Split Vertically
- Close
- Close All
- Each tab or screen selected has specific menu options on the top of the main menu options
-
-